Background
May 24, 2010
Studio 5 Dollar Bill Origami
Today on Studio 5 they had a segment called Fun Ways to Give Cash. Michelle Lunt from Faith, Trust and a Little Pixie Dust showed everyone how. It is such a clever way to give money as a gift by adding a little personality. There's everything from a tie to an ATM machine! It looks so cool. Everyone loves getting cash as a gift, why not make it interesting? Go to Michelle's blog for the tutorial.
ChelseaAnn
Tater Tots and Jello Giveaway
ChelseaAnn
May 21, 2010
Oh My Goodness, Berry Pies!
ChelseaAnn
May 20, 2010
Picture Frame Makeover
The first step was the clean the frame and remove the "smile" embellishment. After that was done I pulled out my best friend...Mod Podge. Okay, so really the hot glue gun is my best friend, but Mod Podge comes in at a close second! I love a black and white color scheme, so classic and elegant. So I had some black tissue paper that I simply tore into pieces and glued on with MD (Mod Podge). The bright orange was still peeking through so I ended up doing two layers of the tissue paper and it turned out just the way I had originally pictured it (when does that ever happen??).
I cut a strip of black lace and attached it to the bottom of the frame, pleating as I glued. I trimmed off the excess lace (and kept it for later use of course!). I originally wanted two posies made from text like these I saw at From Glitter to Gum Drops. But that didn't turn out and I ended up just cutting out a lopsided circle, inking the edges and gluing a black with white polka-dot scrapbook flower. I added a white ribbon and a few rhinestones and that was that!
ChelseaAnn
Easy (and Yummy!) Fruit Dip
So the recipes is quite simple. One brick of cream cheese (8 oz) and one small size jar of marshmallow fluff (6-8 oz). You can use flavored cream cheese if you like, or go classic, that's up to you. I do recommend not using Fat Free cream cheese because it just doesn't mix up as well and of course the taste just isn't the same. So you just combine the two ingredients and beat for about three minutes until its really fluffy. Then you are good to go!And yes...I did cheat, that is pre-cut fruit from the store...I won't tell if you don't.
ChelseaAnn
May 18, 2010
Camera Case
My materials:
I just measured out three circles. The first one is about 2 1/2 inches, the second one is 2 inches and the third is about an inch and a half.
On the smaller teal piece I attached the soft side of the velcro. I really wanted a snap to make it "classier" but I didn't have any on hand so velcro had to do! Oh and since I had my best friend on hand (aka the hot glue gun) I both glued and stitched on the velcro. I'm not too confidant in my sewing skills if you couldn't tell. :P
May 14, 2010
Rainbow Cupcakes
Anywho...onwards we go! Pretty much all you need is white cake batter...now here you can be an awesome over-achiever and make yours from scratch or you can be like me and say hello to good old Mrs. Crocker (or is it Ms. Crocker?? Hmm...we have a mystery, folks). After you get your cake batter whipped up, divide the batter evenly into six bowls. Add some food coloring in the colors of the rainbow (red, orange, yellow, green, blue & purple) or whatever colors you fancy. You should get this:
Then fill your cupcake liners with a spoonful of each color, layering evenly. Just a fun tip, use plain white liners. When you finish the cupcake, the liners look awesome! I almost wanted to save them to use for another crafts...but luckily I stopped myself. I have limits...that I mostly adhere to.
Back to the project...So like I said, layer a spoonful of purple batter and coat the bottom evenly, then follow with blue, making sure not to disturb the layer below. Continue until you finish with the red layer. Or you can be different and put them in any order you please. Go ahead, be a rebel.
Once everything is layered-out, pop those suckers in the oven according to the mix's directions. Mine were in at 350 for about 30 mins...they needed a few more minutes than the recommended time. And when that dinger dings...you get these yummy concoctions:
So I left it up to the kid-lings to frost. I just used some Whipped vanilla frosting combined with a bit of Cool Whip for a lighter look and taste. In my mind I was picturing white, fluffy clouds. Of course the kiddos saw things differently, like they always do. Oh and I couldn't help but break out the sugar sprinkles...guilty. Now, if only I could've left it up to a maid to clean up the mess....oh, I guess that's me.
That darling ten-year-old pictured above is Emily...aka, Emily May-May, being very precise in her sprinkling. The kids loved them and I'm sure we'll get around to making them again this summer. I already have tons of variations running through my crazed mind.
ChelseaAnn
My Someday Folder
ChelseaAnn
One Crafty Mamma
They come in all different fabrics. I'm going to let her explain what a Potato Bag is just in case you're wondering:
"BAKED POTATO MICROWAVE BAG AND SO MUCH MORE!! THIS SIMPLE BAG CREATES A 'JUST RIGHT' BAKED POTATO IN YOUR MICROWAVE! THE INSIDE IS WELL DONE; YET MOIST. WHILE THE SKIN REMAINS TENDER! THIS BAG WILL COOK ONE TO FOUR MEDIUM SIZE POTATOES.
I HAVE FOUND MANY MORE USES FOR THIS MICROWAVE BAG, NOT ONLY POTATOES CORN ON THE COB, TORTILLAS AND ROLLS. I HAVE USED MINE FOR TAMALES, CROISSANTS, MUFFINS AND MORE. JUST REMEMBER TO WRAP EVERYTHING IN A PAPER TOWEL. I SUGGEST ONLY USING THE BETTER BRANDS OF PAPER TOWELS FOR DURABILITY AND YOU CAN REUSE THE PAPER TOWEL ONE TO TWO MORE TIMES IF YOU CHOOSE TOO.
MY 'POTATO-TAMALE BAGS' ARE BIGGER THAN EVERYONE ELSE. THEY MEASURE 10 1/2" WIDE, 9 1/2 HIGH. I MAKE MINE A BIT BIGGER. WHY YOU ASK? I HAVE TEENAGE BOYS AND THEY WANT 'THE MONSTER SIZE POTATOES' POTATO BAGS, SO I MET THE DEMAND! I PREFER THIS OVER MY FIRST ONE I MADE THAT IS THE 'TRADITIONAL SIZE.' BUT YOU CAN STILL USE THE 'TRADITIONAL SIZE POTATOES'. IT CHANGES THE AMOUNT OF POTATOES YOU CAN PLACE IN THE BAG!
DIRECTIONS ARE INCLUDED!
MY 'POTATO-TAMALE BAGS' ARE DESIGNED WITH A FLAP TO HELP RETAIN THE MOISTURE IN. THIS HELPS PREVENT THE POTATOES FROM DRYING OUT!
EACH 'POTATO-TAMALE BAG' IS HANDMADE WITH 100% COTTON FABRIC AND THREAD. THE LINER A SPECIAL THERMAL LINING. I HAVE MANY YEARS OF EXPERIENCE IN SEWING.
EASY CARE OF 'THE POTATO-TAMALE BAG'. CHOOSE TO AIR DRY OR YOU CAN MACHINE WASH IN COLD WATER AND TUMBLE DRY ON VERY LOW HEAT. I DO TURN MINE INSIDE OUT.
A CHARITY DONATION IS MADE TO FEEDING AMERICA, A LOCAL NO KILL SHELTER AND ANYTHING THAT HAS PURPLE OR BUTTERFLIES IT IS DONATED TO EPILEPSY RESEARCH. "
ChelseaAnn
Fantastic Felt Flower
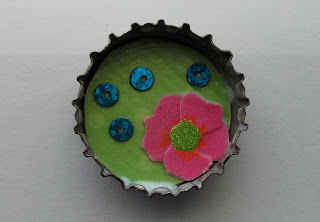
Bottle Cap Magnets
Not too shabby, eh? No, really, I was completely rushed for time so I had to run through this one at lightning speed. When I actually make these with the kids this summer, I think I''ll put something under the paper or triple the thickness to make it rise a bit more. It just seemed a little too shrunken in for me. Once I got everything ready, it took me about five minutes to complete. A project my no-patience children will actually complete!All the stuff I used (minus the magnet and tape). I got these mini sequins from a skirt I bought a few weeks ago. I knew I could use them!
ChelseaAnn
Hedgehog Cupcakes
If there's one thing you need to know about me...it's that I love cupcakes. And why wouldn't I? They're mini cakes...how much cuter can you get?
About Time
I grew up with a wonderfully crafty mom...something I now realize I took for granted. I love taking pieces of nothing and creating something beautiful. I love all sorts of crafting...although I'm not much of a seamstress. That's on my to-do-list (my ever-growing to-do-list!). So this blog is more for me to keep track of my "someday" crafts and projects...but you're welcome to join me! So here we go!
ChelseaAnn