Background

Showing posts with label all about crafts. Show all posts

November 9, 2010

Fall Wreath

You know that fall wreath I mentioned awhile back? The one that I just couldn't wait to start? The one that was tempting me every minute of every day to make? Yeah...apparently I have some awesome self-control because 10 days AFTER Halloween, and several snowfalls later, I finally decided to do it.

And you know what?

I still loved making it.

I started out with two 50 count packages of wood clothespins (I only ended up using about 75 or so), four various scrapbook papers in fall designs, Modge Podge, an embroidery hoop, cardboard (I ended up using a pizza box) ribbon and brown paint.

The first step was painting the hoop brown. You only need the inside circle (without the tightner). I just painted on top of my pizza box to lessen the mess.

I started out painting the clothespins brown. This is not a necessary step since the part of the clothespin shown will be covered in paper. But I like knowing that my whole clothespin is pretty. So I painted every part except the top surface. Obviously, you don't need to be neat in your painting technique...

While they dried, I started cutting out strips of paper. I just took one of the unpainted clothespins, measured it and and cut the width of them to the end of the scrapbook paper. I ended up getting three clothespins per strip of paper.

After the pins are completely dry, add some Modge Podge to the unpainted part of the pin. Then add the strip of scrapbook paper and apply another coat of Modge Podge. Set aside to dry.
After you think you've developed a severe case of arthritis...this is what you have...only halfway:
Now, take the pizza box, or whatever cardboard you're using, and trace around the outside of your embroidery hoop. Then trace another circle about two to three inches outside of that one. You should have something like this:
One small circle from the hoop and a larger circle (from a serving bowl if you're like me).

Cut that sucker out and you'll have this. It's up to you if you want to paint it. I took the lazy way out. When it's cut out, make sure your hoop fits snugly inside the cardboard ring. I had to do a bit of trimming. When I thought it fit nicely, I went back and hot glued it in, so it would be secure.

Now, pick your pattern and start clipping the clothespins on! If you feel the need, hot glue them on.

I didn't feel the need.

I apologize for that awfule glare. I really, really do.

After all the clips were in place I added some orange glitter glue to sparkle it up a bit. Yes, sparkle can be a verb.

I found some 3 inch wire ribbon at Michael's a few days after Halloween for a buck. Maybe procastinating is a good thing afterall. :)


ChelseaAnn

November 5, 2010

Earring Holder

Some of you might identify with this obsession I have....I am an earring-aholic. I LOVE earrings! I could be wearing 10 lbs of accessories but without earrings, I just feel naked.

It's sad to say, but I already have one large earring tree FILLED to the brim with earrings. Infact, it's spilling over into my other jewelry organizers. So I figured it's about time I got another one to control the chaos.

There are a million of these tutorials in blogworld but I take pictures of almost every craft I do, so I might as well share!

I went to the DI and picked up a frame for a buck fifty. For some reason the measurements are off, it's not quite 8.5x11. But I love it. It's special. It fits right in. Unfortunately, I did not take a before picture of this "special" frame. But picture a boring wood, not quite normal measurements, frame.

I put a few coats of black paint, let that dry and then spray painted it with some metallic silver. Then I took some sandpaper and gently sanded it, some places harder than others, so that the black and come through.

Then I cut a piece of lace in 10'x12'. And since my glue gun is permanantly attached to my right hand, I just pulled the lace relatively tight and glued it down on the back.

I thought I was done....nope. I put together a few silk flowers and attached them to the upper-left hand corner with some extra black lace. Then I took some 1/2 inch white ribbon and made a few small loops.


Ta-da! Er...nope, not quite done. The bottom-right corner needed a little something. So I took some small black oval beads and glued them in the little ridge.

Okay, now I'm done. I think.


ChelseaAnn


P.S. I'm linking up to the Weekend Wrap Up at Tatertots and Jello!


October 16, 2010

Quick, Simple & Cheap Halloween Project for the Kiddos


This is in no way, a clever project...but if you want to keep your kids entertained for a few moments, this a life saver. All you need is a sheet of paper (preferably cardstock or construction paper), some tissue paper and a Sharpie. Take your paper and draw an outline of a pumpkin, bat, ghost, spider or whatever spooky Halloween image you can think of. You'll want to cover the majority of the page and remember, it's just the outline. No details needed! You could probably google the image and print it off if you have little faith in your artistic abilities. I drew a spider for my kids. 2 simple circles and then bent lines for legs. I apologize for no photos, but this is a simple concept so hopefully they're not needed.

Here's where the kids come in! Give them a sheet of the tissue paper in the appropriate color (ex. orange for pumpkin...duh) and have them rip it into tiny pieces about the size of a quarter or so. Then give them some glue and glue those suckers on! And by that I mean, fill in the outline by gluing the tissue paper down. Have the kids fill the picture in completely so that no spots are showing. And that's that!

And because this post is severely lacking in pictures...
ChelseaAnn

October 13, 2010

Waiting For Fall...

With the nip in the air this morning (I had to pull out my four inch-thick sweater!) I'm already thinking ahead to the holidays. Which is completely weird since I absolutely love Halloween and could never skip it! But ideas for fall wreaths are running (sporadically) throgh my head and I'm getting the itch. You know, the crafting itch? That irrepressible urge to craft no matter the time of day, lack of materials or how many responsibilites already lie on your plate. But I'm controlling myself...sorta.

In the meantime, I had to do something. I noticed that my front door display still needed a little extra somethin-somethin. And I knew just what to do!

I was at a friend's house the other day who gave me a few extra decorations she no longer needed. Incuding these:

I immediately knew what I wanted to do with the cute pot. I went outside and found some "creepy" twisted looking sticks and spray painted them a metallic silver...it was all I had on hand but I think it worked!

I had some floral foam and stuck it in the bottom of the pot and put some rocks around it to weigh it down. After the sticks were dry I stuck them in the foam. I had a package of spider web stuff I picked up at Wal Mart ealier. I put some at the base of the sticks to cover the foam and rocks. Then I loosely hung some around the sticks.
I thought it needed a little extra so I hung some paper bats from a few of the sticks.
For the bats I just printed out an outline and cut them out of black cardstock.
I have a little planter stand that had been sitting {somewhere} in storage for awhile. After sucking it up, I dug through the storage and finally found it.

I laid some more spider webs on the top part and set the pot on top. I used the cute ghost house to fill in the bottom layer and nestled some more spider web around that. And since I only paid for the spider web ($2) I had an awesome Halloween display for practically nothing!


Happy Halloween!!

ChelseaAnn

October 10, 2010

Halloween Cupcake Liner Wreath

Halloween is absolutely my favorite holiday of the year! In order to showcase my um...obession, I made a super cute and easy wreath from cupcake liners. You'll need to grab some various colored cupcake liners. There area whole bunch of cute Halloween ones out now! You'll also need a styrofoam wreath, black netting or touelle and some decorative accents of your choosing. The liners I bought also cme with some cute cupcake toppers.

Before I get started, I have to apologize for my not-so-great pictures...it was late and I was in a rush.

First things first, in order to get your liners to flatten out you'll have to fold your liners in half.
Then, to create your starburst pattern, cut slits every so often. Measurement is up to you completely. Fewer slits means bigger "rays" and more slits are smaller and more "rays."


When you are done simply apply with a glue gun! I used several different liners as you can see and in some areas I left some folded and glued to the sides. I also have bits of black netting in places although it didn't really show up in the pictures!


If you try it out, send in you own picture! I wanna see!

ChelseaAnn

August 21, 2010

Easy Wall Art

For awhile I've been wanting to do something with the small space above my closet since my bed faces in that direction. I'd been planning on doing some sort of vinyl saying like "Live life to it's fullest" or something with that feel. Then one day I was roaming around Kmart and found some simple black frames for a quarter each. Then something sparked in my head so I raced back home, pulled out some colorful scrapbook paper.

I have to apologize for the lack of pictures in this one. I was in such a hurry to make the picture in my head a reality that I didn't think to grab my camera until it was all said and done. So, you'll have to deal with my boring dialogue.

I picked out four shades of paper in cheery colors with a simple design. I ended up with a teal, spring green, bubble gum pink and orange. I took out the glass from the picture frames and measured and cut the paper. Then I placed the paper inside, along with the glass, just like a regular picture.

Next, I made a quick trip to Michael's to get some wood letters. I decided to go with "LIVE." Instead of having a long quote or phrase, I wanted LIVE, simply LIVE. I painted these letters black and hot glued one on each frame. After I was done, they still needed a little something. After wondering what to do I decided to tie two ribbons on the L and embellish the V frame with some silk flowers.

And this is the finished product.


July 6, 2010

Jewelry/Knick-Knack Box

So I'm very much the person who would rather repurpose something than throwing it in the garbage. Which is why I have a whole drawer of...well, basically junk. But if you're a semi-crafty person you know that one man's trash is another man, excuse me, woman's treasure.

And this little characteristic of mine rebelled violenty when a friend of mine wanted to throw this cologne box away:


Um, hello mister! Do you not see the potential here?? I just loved the untraditional way it opened...the lid slides off if you can't tell from the picture. So after asking for it and receiving a weird look, I got my soon to be treasure! And this is what I did...

I'm not gonna lie, I didn't have big plans for this treasure box of mine. All I really had in mind was some new scrapbook paper I bought at Robert's two days prior. Paper that I absolutely loved and had to put on display. So my only plan was to simply Modge Podge that paper on and "gjush" it up a bit.
So I picked my paper and on the backside, traced all the sides of my box and the lid.
Once the paper was cut out, I made sure it would line up perfeectly with the box. After some minor trimming, I stamped the edges of the paper with a black ink pad. I even brushed it lightly across the entire paper. These are my four main pieces:
The next step was to simply glue it on with Modge Podge. I used a matte finish, but the glossy would work fine. I didn't originally plan on doing the inside of the box, but I later changed my mind...of course.
For the top, I used the opposite of the paper and Modge Podged it to the lid. Then I had some decorative 3-D stickers that I adhered to the top. After going over all the edges one more time with the ink pad I was done! What a quick, simple project! And I absolutely love it :)
ChelseaAnn

May 24, 2010

Studio 5 Dollar Bill Origami


Today on Studio 5 they had a segment called Fun Ways to Give Cash. Michelle Lunt from Faith, Trust and a Little Pixie Dust showed everyone how. It is such a clever way to give money as a gift by adding a little personality. There's everything from a tie to an ATM machine! It looks so cool. Everyone loves getting cash as a gift, why not make it interesting? Go to Michelle's blog for the tutorial.

ChelseaAnn

May 20, 2010

Picture Frame Makeover

This picture frame was given to me a few years ago from a friend of mine. She was a foreign exchange student from Brazil. After we graduated we stayed in touch for awhile, but now it's been a few years and we've both have moved a few times and have lost contact. Now I think it's okay to update the frame without hurting her feelings, because frankly the frame doesn't match my decor at all. So I ended up turning that into this:
The first step was the clean the frame and remove the "smile" embellishment. After that was done I pulled out my best friend...Mod Podge. Okay, so really the hot glue gun is my best friend, but Mod Podge comes in at a close second! I love a black and white color scheme, so classic and elegant. So I had some black tissue paper that I simply tore into pieces and glued on with MD (Mod Podge).
The bright orange was still peeking through so I ended up doing two layers of the tissue paper and it turned out just the way I had originally pictured it (when does that ever happen??).
I cut a strip of black lace and attached it to the bottom of the frame, pleating as I glued.
I trimmed off the excess lace (and kept it for later use of course!). I originally wanted two posies made from text like these I saw at From Glitter to Gum Drops. But that didn't turn out and I ended up just cutting out a lopsided circle, inking the edges and gluing a black with white polka-dot scrapbook flower. I added a white ribbon and a few rhinestones and that was that!
ChelseaAnn

May 18, 2010

Camera Case

For my birthday not too long ago I was given a brand new point and shoot camera...something I desperately needed/wanted! I needed a case for it so I was just going to throw a quick one together from some fabric scraps. Well, that was until I became aware of the felt craze that is going on. Can I just say I love felt? It's easy to work with, it's cheap and it doesn't fray. So I decided to make a felt camera case.

I had a picture in my mind of a simple case with a top flap that was accented with some sort of decoration. So I started with four different sheets of felt, I chose teal, white, purple and baby blue. I started with my decoration just because I knew that would take the most time. Here's what I came up with:

My materials:
I just measured out three circles. The first one is about 2 1/2 inches, the second one is 2 inches and the third is about an inch and a half.
I had my handy dandy glue gun nearby so I put one dot of hot glue in the center of the two larger circles and attached them as shown in the picture. Then I threaded on multi-colored seed beads. This part is hard to explain so I'm going to do my best! So after threading four beads on you back track and thread your needle through those four again before adding on the next set. Make sense? Probably not. If you need more clarification I'll post a video on the tutorial to better explain it. So you'll continue that process all the way around each circle. For the center decoration I threaded three beads on and made the second stitch right next to the first one so that they would bunch. I repeated that two times, but of course you can do it as much as you like.

Now for the actual case! After measure my camera I cut out three pieces of felt (one teal, two baby blue) that measured the length of my camera plus an additional inch and a half on the length side and the width side. Just to clarify, the ouside of my case is teal and for extra cushion the inside will be a different piece of felt in baby blue. Anywho, the second piece of teal felt is going to be the same width, but an additional 3-4 inches. This one will be used as the back and the flap piece.

On the smaller teal piece I attached the soft side of the velcro. I really wanted a snap to make it "classier" but I didn't have any on hand so velcro had to do! Oh and since I had my best friend on hand (aka the hot glue gun) I both glued and stitched on the velcro. I'm not too confidant in my sewing skills if you couldn't tell. :P

After that is stitched on, I layer the four pieces in order from bottom to top: larger teal pices, the two baby blue pieces and the smaller teal piece with the velcro strip. Using baby blue embroidery floss I stitched around the edges, about an inch in. I preferred the larger stitches but that's all up to you, my friend.

Once you are happy with that, cut off the excess felt. I cut my teal felt closer to the seam than the baby blue so that the dimension of the accent color can show.

Back to the circle decoration...on the backside of the circle I sewed on the rough side of the velcro strip. I attached it very close to the bottom of the circle. The other half of the circle I sewed/glued on to the top of the flap.

Then ta-da! You, my friend, are finished and ready to protect your camera!
(PS...Miss Blonde here really wanted to take a picture of her camera in it's case....until she realized that's not really possible. Whoops!)
ChelseaAnn

May 14, 2010

My Someday Folder

Since I'm not yet a mom, I have anxiety about seeing craft and design ideas I love but will eventually forget once I get to the motherhood chapter of my life. This wall art by LollyChops is definitely giving me that anxiety at the moment.
Did I mention I'm selfish when it comes to crafts? I am. I need this! I have absolutely no legitimate reason. That's why I need a kid, a little girl to be exact. Don't freak Mom! I will control my urge...for now. So here I am, putting yet another adorable project into my "Someday" folder. Oh...and I need to learn how to crochet. That I can at least get started on now.

ChelseaAnn

One Crafty Mamma

I mentioned before that I grew up with an incredibly crafty mom. I can't even begin to explain how my childhood was blessed with creativity! We had a whole room dedicated to crafts containing bins upon bins of supplies. I just wanted to spotlight my mom real quick and let everyone know about her eBay store. She sells these really cute Potato Bags:

They come in all different fabrics. I'm going to let her explain what a Potato Bag is just in case you're wondering:

"BAKED POTATO MICROWAVE BAG AND SO MUCH MORE!! THIS SIMPLE BAG CREATES A 'JUST RIGHT' BAKED POTATO IN YOUR MICROWAVE! THE INSIDE IS WELL DONE; YET MOIST. WHILE THE SKIN REMAINS TENDER! THIS BAG WILL COOK ONE TO FOUR MEDIUM SIZE POTATOES.

I HAVE FOUND MANY MORE USES FOR THIS MICROWAVE BAG, NOT ONLY POTATOES CORN ON THE COB, TORTILLAS AND ROLLS. I HAVE USED MINE FOR TAMALES, CROISSANTS, MUFFINS AND MORE. JUST REMEMBER TO WRAP EVERYTHING IN A PAPER TOWEL. I SUGGEST ONLY USING THE BETTER BRANDS OF PAPER TOWELS FOR DURABILITY AND YOU CAN REUSE THE PAPER TOWEL ONE TO TWO MORE TIMES IF YOU CHOOSE TOO.

MY 'POTATO-TAMALE BAGS' ARE BIGGER THAN EVERYONE ELSE. THEY MEASURE 10 1/2" WIDE, 9 1/2 HIGH. I MAKE MINE A BIT BIGGER. WHY YOU ASK? I HAVE TEENAGE BOYS AND THEY WANT 'THE MONSTER SIZE POTATOES' POTATO BAGS, SO I MET THE DEMAND! I PREFER THIS OVER MY FIRST ONE I MADE THAT IS THE 'TRADITIONAL SIZE.' BUT YOU CAN STILL USE THE 'TRADITIONAL SIZE POTATOES'. IT CHANGES THE AMOUNT OF POTATOES YOU CAN PLACE IN THE BAG!

DIRECTIONS ARE INCLUDED!

MY 'POTATO-TAMALE BAGS' ARE DESIGNED WITH A FLAP TO HELP RETAIN THE MOISTURE IN. THIS HELPS PREVENT THE POTATOES FROM DRYING OUT!

EACH 'POTATO-TAMALE BAG' IS HANDMADE WITH 100% COTTON FABRIC AND THREAD. THE LINER A SPECIAL THERMAL LINING. I HAVE MANY YEARS OF EXPERIENCE IN SEWING.

EASY CARE OF 'THE POTATO-TAMALE BAG'. CHOOSE TO AIR DRY OR YOU CAN MACHINE WASH IN COLD WATER AND TUMBLE DRY ON VERY LOW HEAT. I DO TURN MINE INSIDE OUT.

A CHARITY DONATION IS MADE TO FEEDING AMERICA, A LOCAL NO KILL SHELTER AND ANYTHING THAT HAS PURPLE OR BUTTERFLIES IT IS DONATED TO EPILEPSY RESEARCH. "

So there you have it! Check out her ebay store, Horse Creek Farm and Design

ChelseaAnn

Fantastic Felt Flower

Oh me, oh my! Another thing I obsess with...buttons. And buttons plus flowers? Heaven. I don't have any felt on hand...and I can't say I know what to use the flower for, but I WILL make this adorable piece of heaven! Check out LollyChops for the tutorial and some of her other (not as ridiculously cute, but still adorable) flowers!

ChelseaAnn

Bottle Cap Magnets

So I subscribe to Family Fun magazine and if you don't, make sure you check out their website every now and then. Although I'm not a parent myself, I am a nanny to three great kids. So I love Family Fun for giving me some great ideas when my own creative juices are running low. I was flipping through an older issue the other day and came across these:
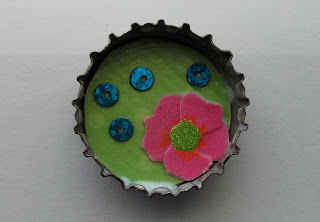
Needless to say, I had to make my own. What can I say? The cartoon animals with their irresistable googly-eyes were calling my name! I really, REALLY wanted to make one with a cute litte panda. So I jumped in my car and rushed to the craft store. After searching endlessly (a whole fifteen minutes!) for a panda sticker or something else I could use...I eventually gave up. My itch to make these was just becoming so strong. So I grabbed a new bottle of Mod Podge and drove home. After reading these directions I came up with this:

Not too shabby, eh? No, really, I was completely rushed for time so I had to run through this one at lightning speed. When I actually make these with the kids this summer, I think I''ll put something under the paper or triple the thickness to make it rise a bit more. It just seemed a little too shrunken in for me. Once I got everything ready, it took me about five minutes to complete. A project my no-patience children will actually complete!All the stuff I used (minus the magnet and tape). I got these mini sequins from a skirt I bought a few weeks ago. I knew I could use them!

ChelseaAnn

Join us Saturdays at tatertotsandjello.com for the weekend wrap up party!